
Anyone can put a boom box on the shelf and turn it on; but setting up a set of surround sound speakers, and getting the optimal audio fidelity takes a little more effort. Speakers are often considered the soul of your system, and generally 50% of your total budget should be spent on the speakers. The first thing to consider is the size of the room, followed by what you listen to the most. Are you rocking out, or watching chick flicks with a lot of dialog?
A smaller 50-watt home theater in a box system is best used in a reasonably sized living room (15 x 15 feet), so trying to use it in a massive great room in a trophy home isn’t going to work so well. Likewise, a 1000watt system that shakes the walls in a studio apartment is just plain silly. And are you listening to jazz, techno or watching action films? These all sound different and should help you determine how much total system power you might need. Fortunately there is a handy speaker quiz on Axiom’s speaker site that can help, which is useful even if you don’t go with their system.
After figuring out what will work in your room, you need to think about placement. All listening rooms, whether it is the family room or a dedicated room you use just to chill out to music will have a so-called sweet spot. In simplest terms this is the place where music will sound its absolute best. For sending up speakers this is generally the mid point of the room. Generally the two front speakers should be equal distance apart from the center channel, and just about 12-feet apart from each other.
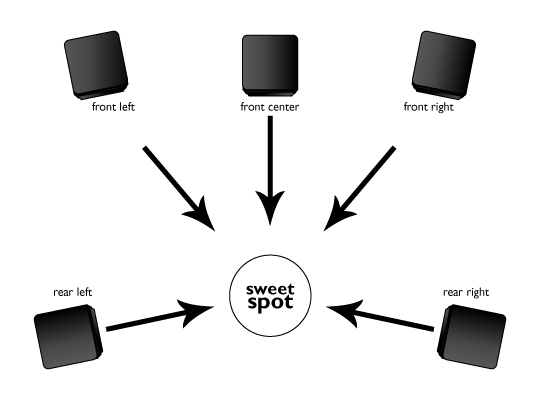
The side speakers should be off to the side of, and slightly behind the couch or general listening area. If you’re using a 6.1 the rear speakers should be placed in direct line with the front center channel, while 7.1 systems essentially add sides and rears. Thus with any multi-channel system the general listening area is, as expected, surround by speakers.
Once the speakers are placed you need to wire them. There are numerous options for wireless systems, but these should often be avoided in large cities as the frequency of the speakers often overlaps with cordless phones and other wireless technology. All this picks up extra noise.
When laying the cables to the speakers it is highly advisable to buy higher quality speaker wire. Also, make sure that the speaker cables avoid contact with electrical wires, as this can increase extra background noise. It goes without saying to be sure to connect the proper outputs to the proper speakers (i.e. center channel output to center, rear left to rear left, etc.). But it isn’t hard to get slightly confused and accidentally swap the right and left rear speakers. This will have noticeable results at awkward times… such as when you’re showing off the system to your ultimate audiophile friend. Fortunately, most higher end receivers will let you run a test signal and this can insure that the speakers are properly connected.

The other thing to avoid is setting up the speakers out of phase. This is a much more common problem, and out of phase music won’t sound right.
Each output on the receiver, and input on the speakers is color coded as red and black. Speakers are connected red-to-red; black-to-black, which can be confusing as you connect inputs to outputs, etc. If the cables aren’t coded (and most higher quality cables are a plain color) then you need to look for a subtle but clear reference mark on the casing. This is typically information such as the gage of the wire, and is always printed on a single side of the two wires, indicating that it is meant to be “black” for example. To ease confusion, determine which side this reference mark is on and use a Sharpie and mark it as black at the ends. If you get really confused mark the other wire as red! This will make it easier should you have to disconnect and reconnect the wire at a later time.
Once the speakers are wired up there are several products to help adjust the specific volume. Again, it is advisable to test and adjust sound from the central sweet spot. This is where movies and music should sound about as good as it gets, insuring that good sound is heard throughout the listening area. Use a sound level meter to help tweak the specific volume from individual speakers. Once everything is set up, crank it up so the neighbors can take notice!
A couple of tools to get the job done right:
RadioShack Model 33-4050 7-Range Analog Display Sound Level Meter (radioshack.com, $39.99)
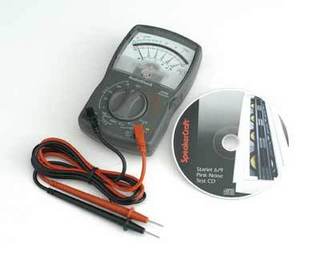
If it’s too loud… it isn’t going to sound right; age and being too old has nothing to do with it! And while many music lovers just plug and play it loud, audiophiles know that proper equalization is the key to good sound and audio clarity. RadioShack’s Sound Level Meter, which reads sounds from 50 to 126dB across seven ranges, uses an omni-directional electrets condenser microphone to accurately pick up audible waves from all directions. This will let you precisely measure area noise so you can properly equalize your system’s audio response to match the acoustic surroundings.
Xcelite 104CGV 8 1/4″ Wiring Tool (xcelite.com, $14.95)

There are plenty of wrong ways to cut and strip wires—too many of which often involve using your teeth. But a much better solution is to have this tool handy anytime you’re working with speaker cables or other electrical wires. This small but strong wiring tool can cut and strip copper and aluminum wire from 10-22 AWG (American Wire Gage), and it can also do double duty as a crimper and another set of pliers. Rubber coated handles will be gentle on your hands and increase the amount of tension you can apply as well. You’ll get neater cut wires that are properly stripped; plus it is a lot better for your teeth.

Help Key is a new tutorial series conducted by CrunchGear writers