Your life probably involves a lot more videoconferencing now than it did a few weeks ago – even if it already did involve a lot. That’s not likely going to change anytime soon, so why not make the most of it? The average MacBook webcam can technically get the job done, but it’s far from impressive. There are a number of ways to up your game, however – by spending either just a little or a whole lot. Whether you’re just looking to improve your daily virtual stand-up, gearing up for presenting at a virtual conference, or planning a new video podcast, here’s some advice about what to do to make the most of what you’ve got, or what to get if you really want to maximize your video and audio quality.
Level 0
Turn on a light and put it in the right place
One of the easiest things you can do to improve the look of your video is to simply turn on any light you have handy and position it behind the camera shining on your face. That might mean moving a lamp, or moving your computer if all your available lights are in a fixed position, but it can make a dramatic difference. Check out these examples below, screen grabbed from my Microsoft Surface Book 2 (which actually has a pretty good built-in video camera, as far as built-in video cameras go).
The image above is without any light beyond the room’s ceiling lights on, and the image below is turning on a lamp and positioning it directed on my face from above and behind the Surface Book. It’s enough of a change to make it look less like I got caught by surprise with my video on, and more like I actually am attending a meeting I’m supposed to take part in.
Be aware of what’s behind you
It’s definitely too much to ask to set dress your surroundings for every video call you jump on, but it is worth taking a second to spot check what’s visible in the frame. Ideally, you can find a spot where the background is fairly minimal, with some organized decor visible. Close doors that are in frame, and try not to film in front of an uncovered window. And if you’re living in a pandemic-induced mess of clutter, just shovel the clutter until it’s out of frame.
Know your system sound settings
Get to know where the input volume settings are for your device and operating system. It’s not usually much of an issue, because most apps and systems set pretty sensible defaults, but if you’re also doing something unusual like sitting further away from your laptop to try to fit a second person in frame, then you might want to turn up the input audio slider to make sure anyone listening can actually hear what you have to say.
It’s probably controllable directly in whatever app you’re using, but on Macs, also try going to System Preferences > Sound > Input to check if the level is directly controllable for the device you’re using, and if tweaking that produces the result you’re looking for.
Level 1
Get an external webcam
The built-in webcam on most notebooks and all-in-ones isn’t going to be great, and you can almost always improve things by buying a dedicated webcam instead. Right now, it might be hard to find them in stock, since a lot of people have the same need for a boost in videoconferencing quality all at the same time. But if you can get your hands on even a budget upgrade option like the Logitech C922 Pro Stream 1080p webcam I used for the clip below, it should help with sharpness, low light performance, color and more.
Get a basic USB mic
Dedicated external mics are another way to quickly give your setup a big boost for relatively low cost. In the clip above, I used the popular Samson Meteor USB mic, which has built-in legs and dedicated volume/mute controls. This mic includes everything you need, and should work instantly when you plug it in via USB, and it produces great sound that’s ideal for vocals.
Get some headphones
Headphones of any kind will make your video calls and conferences better, since it minimizes the chance of echo from your mic picking up the audio from your own speakers. Big over ears models are good for sound quality, while earbuds make for less obvious headwear in your actual video image.
Level 2
Use a dedicated camera and an HDMI-to-USB interface
If you already have a standalone camera, including just about any consumer pocket camera with HDMI out capabilities, then it’s worth looking into picking up an HDMI-to-USB video capture interface in order to convert it into a much higher quality webcam. In the clip below I’m using the Sony RX100 VII, which is definitely at the high end of the consumer pocket camera market, but there are a range of options that should give you nearly the same level of quality, including the older RX100 models from Sony.
When looking for an HDMI interface, make sure that they advertise that it works with videoconferencing apps like Zoom, Hangouts and Skype on Mac and Windows without any software required: This means that they likely have UVC capabilities, which means those operating systems will recognize them as webcams without any driver downloads or special apps required out of the box. These are also in higher demand due to COVID-19, so the Elgato Cam Link 4K I used here probably isn’t in ready stock anywhere. Instead, look to alternatives like the IOGear Video Capture Adapter or the Magewell USB 3.0 Capture device, or potentially consider upgrading to a dedicated live broadcast deck like the Blackmagic ATEM Mini I’ll talk more about below.
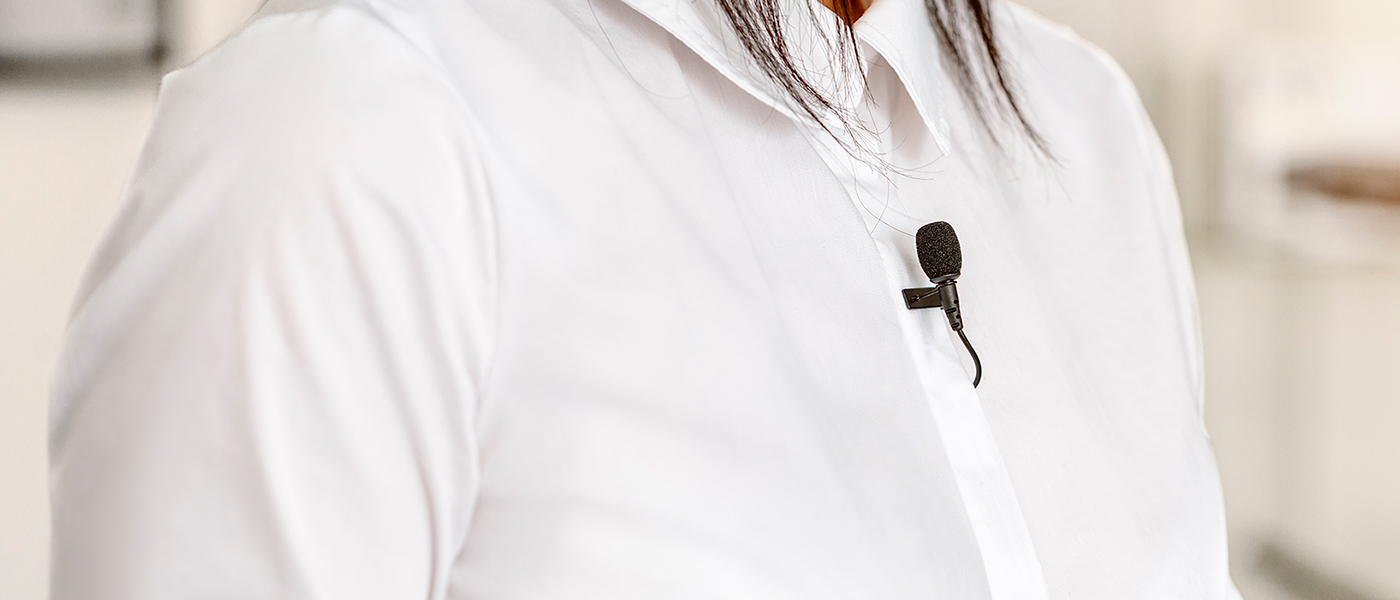
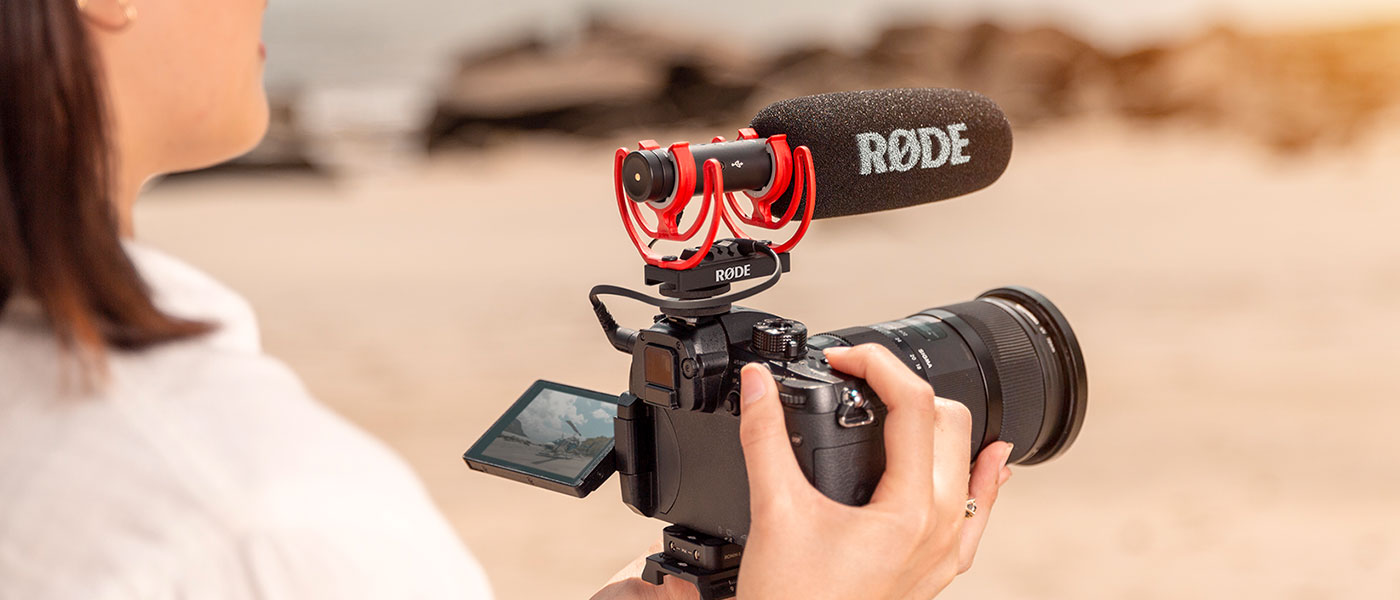
Get a wired lav mic
A simple wired lavalier (lav) microphone is a great way to upgrade your audio game, and it doesn’t even need to cost that much. You can get a wired lav that performs decently well for as little as $20 on Amazon, and you can use a USB version for connecting directly to your computer even if you don’t have a 3.5mm input port. Rode’s Lavalier GO is a great mid-range option that also works well with the Wireless GO transmitter and receiver kit I mention in the next section. The main limitation of this is that depending on cord length, you could be pretty limited in terms of your range of motion while using one.
 Get multiple lights and position them effectively
Lighting is a rabbit hole that ends up going very deep, but getting a couple of lights that you can move to where you need them most is a good, inexpensive way to get started. Amazon offers a wide range of lighting kits that fit the bill, or you can even do pretty well with just a couple of Philips Hue lights in gooseneck lamps positioned correctly and adjusted to the right temperature and brightness.
Level 3
Use an interchangeable lens camera and a fast lens
The next step up from a decent compact camera is one that features interchangeable lenses. This allows you to add a nice, fast prime lens with a high maximum aperture (aka a low ‘f’ number’) to get that defocused background look. This provides natural-looking separation of you, the subject, from whatever is behind you, and provides a cinematic feel that will wow colleagues in your monthly all-hands.
Get a wireless lav mic
A lav mic is great, but a wireless lav mic is even better. It means you don’t need to worry about hitting the end of your cable, or getting it tangled in other cables in your workspace, and it can provide more flexibility in terms of what audio interfaces you use to actually get your sound into the computer, too. A great option here is the RODE Wireless GO, which can work on its own or in tandem with a mic like the RODE Lavalier GO for great, flexible sound.
Use in-ear monitors
You still want to be using headphones at this stage, but the best kind to use really are in-ear monitors that do their best to disappear out of sight. You can get some dedicated broadcast-style monitors like those Shure makes, or you can spring for a really good pair of Bluetooth headphones with low latency and the latest version of Bluetooth. Apple’s AirPods Pro is a great option, as are the Bang & Olfusen E8 fully wireless earbuds, which I’ve used extensively without any noticeable lag.
Use 3-point lighting
 At this stage, it’s really time to just go ahead and get serious about lighting. The best balance in terms of optimizing specifically for streaming, videoconferencing and anything else your’e doing from your desk, basically, is to pick up at least two of Elgato’s Key Lights or Key Light Airs.
These are LED panel lights with built-in diffusers that don’t have a steep learning curve, and that come with very sturdy articulating tube mounts with desk clamps, and that connect to Wi-Fi for control via smartphones or desktop applications. You can adjust their temperature, meaning you can make them either more ‘blue’ or more ‘orange’ depending on your needs, as well as tweak their brightness.
Using three of these, you can set up a standard 3-point lighting setup which are ideal for interviews or people speaking directly into a camera – aka just about every virtual conference/meeting/event/webinar use you can think of.
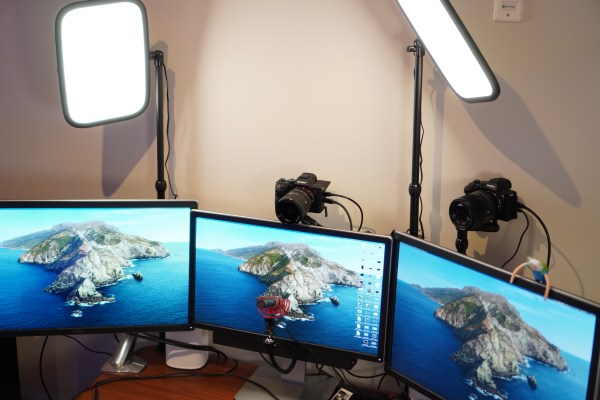
Level 4
Get an HDMI broadcast switcher deck
HDMI-USB capture devices do a fine job turning most cameras into webcams, but if you really want to give yourself a range of options, you can upgrade to a broadcast switching interface like the Blackmagic ATEM Mini. Released last year, the ATEM Mini packs in a lot of features that previously were basically only available to video pros, and provides them in an easy-to-use form factor with a price that’s actually astounding given how much this thing can really do.
 On its own paired with a good camera, the ATEM Mini can add a lot to your video capabilities, including allowing you to tee up still graphics, and switch to computer input to show videos, work live in graphics apps, demonstrate code or run a presentation. You can set up picture-in-picture views, put up lower thirds and even fade-to-black using a hardware button dedicated to that purpose.
But if you really want to make the most of the ATEM Mini, you can add a second or even a third and fourth camera to the mix. For most uses, this is probably way too much camera – there are only so many angles one can get of a single person talking, in the end. But if you get creative with camera placement and subjects, it’s a fun and interesting way to break up a stream, especially if you’re doing something longer like giving a speech or extended presentation. The newer ATEM Mini Pro is just starting to ship, and offers built-in recording and streaming as well.
Use a broadcast-quality shotgun mic
The ATEM Mini has two dedicated audio inputs that really give you a lot of flexibility on that front, too. Attaching one to the output on an iPod touch, for instance, could let you use that device as a handy soundboard for cueing up intro and title music, plus sound effects. And this also means you can route sound from a high-quality mic, provided you have the right interface.
For top level streaming quality, with minimal sacrifices required in terms of video, I recommend going to a good, broadcast-quality shotgun mic. The Rode VideoMic NTG is a good entry-level option that has flexibility when it comes to also being mountable on-camera, but something like the Rode NTG3m mounted to a boom arm and placed out of frame with the mic end angled down towards your mouth, is going to provide the best possible results.
 Add accent lighting
You’ve got your 3-point lighting – but as I said, lighting is a nearly endless rabbit hole. Accent lighting can really help push the professionalism of your video even further, and it’s also pretty easy and to set up using readily available equipment. Philips Hue is probably my favorite way to add a little more vitality to any scene, and if you’re already a Hue user you can make do with just about any of their color bulbs. Recent releases from Philips like the Hue Play Smart LED Light Bars are essentially tailor made for this use, and you can daisy chain up to three on one power adapter to create awesome accent wall lighting effects.
All of this is, of course, not at all necessary for basic video conferencing, virtual hangouts and meetings. But if you think that remote video is going to be a bigger part of our lives going forward, even as we return to some kind of normalcy in the wake of COVID-19, then it’s worth considering what elements of your system to upgrade based on your budget and needs, and hopefully this article provides some guidance.