Earth Day has come and gone, but that doesn’t mean we should go back to our Earth-killing habits. Many desktop PC owners blatantly overlook the low power settings on PCs that still allow functionality of network drives and/or remote applications while in Standby state. Maybe, it is a blatant disregard, but with a little guidance you can do some good for the Earth and, possibly, save a few bucks.
eXoid does a good job with a step-by-step walkthrough, but you may wonder why anyone would need to bother doing this, right? eXoid’s calculations estimate an extra $34.56 you could be paying based on your computer power settings. That adds up over time as your computer becomes bogged down and more power hungry.
Well, todays computers with dual video cards, RAID 0 Configurations, and multiple core processors can eat up a lot of juice. High end power supply units are now rated at over 1000 watts. If we take just a reasonable estimate that a computer uses 400 Watts idling along, we can find some astounding figures.
• I calculated (24 hours per day) * 30 days a month = 720 hours
• Power bills are generally measured in kilowatt hours or “kW/h”s. Power rates might be as much as $0.12 per kW/h
• Our total cost of having the computer on 24/7 for the month in this scenario would be as follows:
• .4 kW (400watts) * 720 Hours * $0.12kW/h = $34.56
Most new computers are already configured to enter S3 Standby mode, but it never hurts to check and make sure. Put the computer into Standby mode and listen for the fans. If they’re still spinning then your computer isn’t properly configured for S3. Let’s get crackin’ and put that power sucker into S3 Standby mode…it’s loads of fun!
• Check your BIOS settings: Make sure your BIOS Power Management settings are set to S3 standby. Unfortunately if it is not set to S3 when windows was installed, Windows will not install the correct settings to allow the computer to sleep in S3 mode. However, just changing the option in the BIOS will override the windows setting on some computers and you may enter the S3 sleep state anyways.
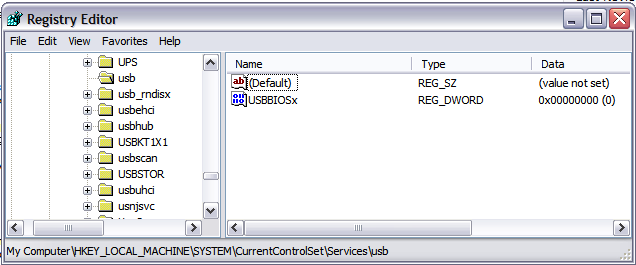
• Are you using a USB keyboard or mouse? This may be holding you back. For fear of allowing a computer to enter a sleep state that it was incapable of resuming from due to incompatible USB devices, Microsoft decided that if USB input devices were present, it would not allow S3 Standby mode. Fortunately this is easily bypassed through use of a registry entry. Just open regedit and enter the following registry entry as described in this Microsoft Knowledgebase Article:
HKEY_LOCAL_MACHINESYSTEMCurrentControlSetServicesusb
“USBBIOSx”=DWORD:00000000
Entering this registry key, then rebooting should allow you to enter the S3 sleep state even while using USB peripherals in Windows XP.
• If your computer enters Standby mode, but then immediately starts back up, your USB devices may be giving you problems, check your computer’s BIOS settings and disable (or enable) USB power on options, changing these settings can allow your computer to function properly.
So far so good, right? Good! Now that you’ve configured your computer to properly enter S3 Standby mode let’s figure out how to use it when you need your computer to be ALWAYS ON if you use your computer as a file server, remote access point or as a VNC host. eXoid notes that the best way to do this is to set a static IP on your local network and here’s how to do it.
1. Navigate to the Control Panel: Doubleclick on Network Connections
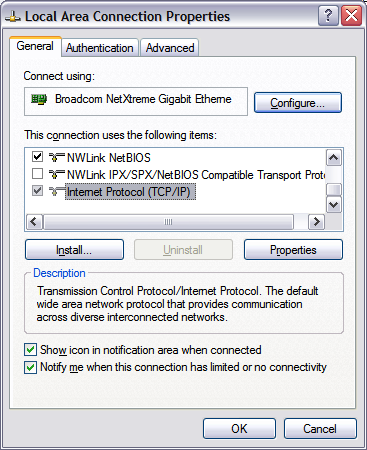
2. Right click your Local Area Network: Choose Properties
3. Select Internet Protocol (TCP/IP)
4. Click Properties.
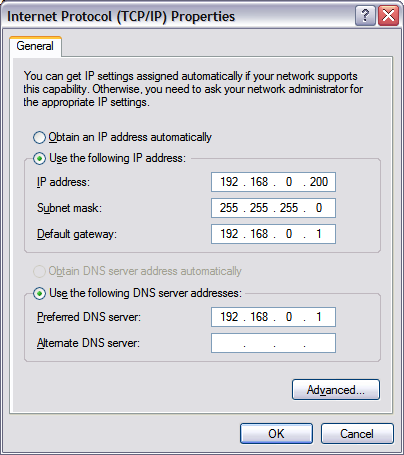
5. Set your IP address manually: (ip address generally can be whatever you want it to be within certain limits, the subnet mask, default gateway, and DNS settings should correspond to your particular router. Check your router manual for more information)
6. Once you have made your changes, click ok and allow your network adapter to reconfigure itself and reconnect to the network.
7. Test your network to see if you still have connectivity by pulling up a browser or checking network accessibility.
We’re in the homestretch now, folks. Here’s how to wake up that PC when there’s traffic on the static IP.
1. Boot into your BIOS, make sure all WOL and network wake up options are enabled. Refer to your manufactuer’s motherboard manual.
2. Boot back into Windows: Navigate to the control panel: Doubleclick on Network Connections
3. Right click your Local Area Network: Choose Properties
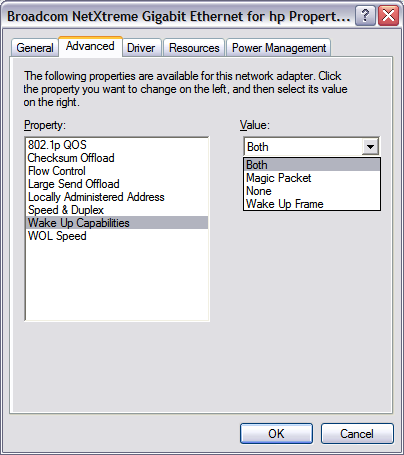
4. In the first box it should show your network adapter. Click ‘Configure’
5. Navigate to the ‘advanced’ tab: Select ‘Wake Up Capabilities’
6. Every network device varies a bit, you want to enable all capabilities, choose ‘both’ or ‘magic packet and wake on pattern’
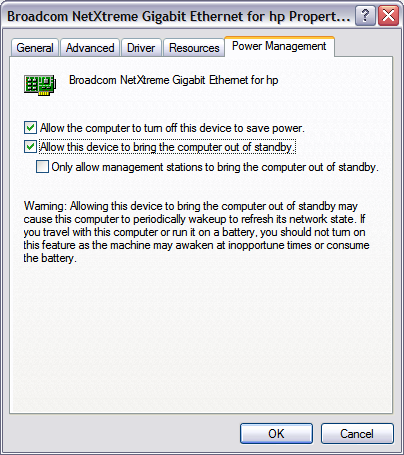
7. Click the Power Management Tab: check the box that states: “Allow this device to bring the computer out of standby”
Once you have selected these options and rebooted, you should now have set your computer up with a very powerful configuration. You can now allow your computer to go into standby mode, yet whenever your network adapter senses any activity on your specific Local ip (in my case: 192.168.0.200) it will quickly resume from S3 standby and perform the functions requested. As soon as the network is not being utilized, your computer will return to standby after the allotted time you have set in your power options settings.
If you’re not sure how to map network drives on an S3 enabled PC then just follow the link and eXoid is happy to help out with that, as well.
Going Green: Utilizing S3 Standby Mode Without Losing Functionality [eXoid]