 By now you’ve probably heard of Google’s App Inventor for Android, a web-based development environment that’s meant to make it possible for non-developers to build their own Android applications. The technology has been in testing for a year, primarily with educational organizations, and may well be a boon for the Android ecosystem as students are introduced to the platform in the classroom. A report in the New York Times quotes project lead (and MIT professor) Harold Abelson as saying “These aren’t the slickest applications in the world… but they are ones ordinary people can make, often in a matter of minutes.” So does this mean Android’s millions of users are about to start programming for their own devices? Not quite.
I spent around 90 minutes this morning cranking away on a few test applications in App Inventor, and while I’m very excited about it, this is not going to be a walk in the park for “ordinary people”. Unless you’re looking to make an extremely basic application — think “Hello World” — you’re going to have to read through the documentation, and in some cases even the existing tutorials won’t be enough. That said, this will be absolutely perfect for the classroom environment for which it’s been tested in. The learning curve is not trivial, but this isn’t something that will take years to master, either.
Before I relay my experience, it’s worth giving a little context regarding my own programming background (or lack thereof). In high school I took a year of Visual Basic, which App Inventor reminds me of in a few ways, and I later took a couple of classes on C++, which hasn’t come into play at all here. I’ve never used Scratch, which App Inventor shares many similarities with. I’d consider myself far less experienced than any professional developer, but I’m probably more knowledgeable than your average Android user.
Getting started on App Inventor is easy relative to installing Eclipse and the Android SDK, but it’s still a bit involved. First you need to ensure that you’ve got the proper version of Java running; next, you install a client for your OS; then you have to change a few settings on your Android phone (allow for applications installed from Unknown Sources, enable Dev mode on the phone, etc.). Plug in the phone, log-in to App Inventor, allow the Java app to run, and you should be good to go. It may sound like a lot, but the whole process won’t take more than ten minutes if you know what you’re doing.
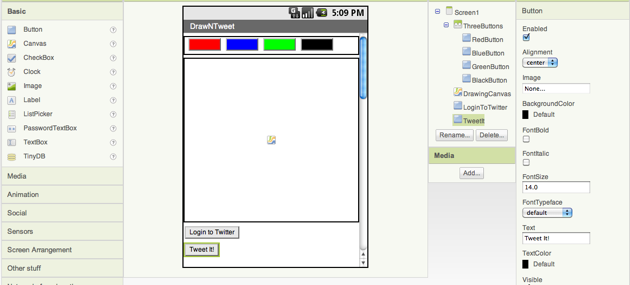
Once you’re off and running, you’ll find that App Inventor is broken into two parts: the Designer and the Blocks Editor. The documentation does a good job explaining the differences, but the gist is that you add components like buttons and text fields and adjust the layout of your application in the Designer (which is a web page), and do the actual drag-and-drop coding in the Blocks Editor (which is a Java app). You can deploy changes to your Android device, hooked to your computer via USB, in less than a minute.
My first (admittedly overambitious) idea was to create an application that would allow a user to monitor TechCrunch headlines for keywords, which could come in handy if a startup wanted to get notified whenever we wrote a post about them. The basic layout was easy enough — I dragged a text box, a label, and a button to the design canvas, then tweaked the width and layout settings to make it look slightly less ugly. Then came the hard part: making those buttons actually do things, which marked my first introduction to the Blocks Editor.
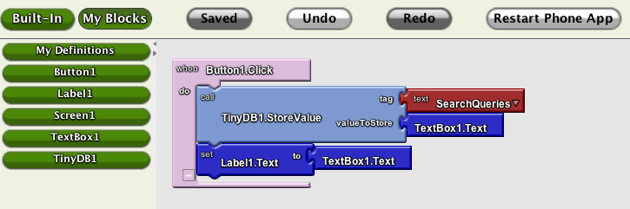
The Blocks Editor reminds me of Apple’s Automator in that it lets you map out your app logic like a puzzle, though the former is obviously much more complex. Getting App Inventor to do what you want is sometimes very easy, assuming it already has a component for that task. Want to store the contents of a text field to a database when the user taps a button? It’s a cinch. Unfortunately, the list of available components sometimes has some frustrating omissions, which I quickly ran into.
Look (For The Right Components) Before You Leap
I initially planned to monitor TechCrunch headlines in my app using an RSS feed, which I assumed would be one of the available components. No dice — as far as I can tell there isn’t any RSS functionality baked in. However, the App Inventor does have some built-in Twitter components, including a search function — perhaps I could simply monitor the TechCrunch Twitter feed for headlines and run the user query against that? After dragging and dropping the proper components into to place (which took all of two minutes), I had the application spitting out Twitter search results for whatever query the user entered, which was very cool. But it’s trickier to monitor an individual Twitter account (I was getting results from all of Twitter), and it was quickly becoming apparent that I didn’t have enough experience with App Inventor to pull this project off. I’ve shelved it for later. Update:Looks like I could have used the join block to add the query and “from:techcrunch” to the search.
Update 2: Professor David Wolber, who runs appinventor.org, has put together a guide explaining how to build my TechCrunch monitor idea using App Inventor’s TinyWebDB component, along with some additional code. Note that you’ll have to know some more advanced programming to get this working.
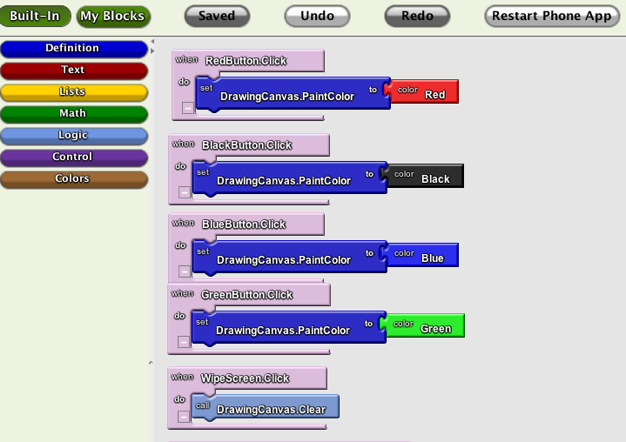
My second attempt was to build an application I’ll call Draw N’ Send. Given my initial setback, the application was to be nearly identical to the one produced with the App Inventor PaintPot tutorial, which allows the user to draw with a few colors on a blank canvas (I hoped to add the ability to email the resulting drawing via email). Things got off to a great start, as they often do when you have a step-by-step guide: I quickly got my colored buttons into place, and getting dots and lines to appear on the Canvas when the user dragged their finger on the screen was surprisingly straightforward. With the basic drawing functionality in place, I got ready to set up my email functionality. Which is when I hit roadblock number two: for some reason there’s currently no component to save the contents of a canvas to an image file, so I had nothing to email. So much for that idea.
Outlook
All of which boils down to say a few things. First, while this may be a development environment “for anyone”, it’s still one that you definitely have to learn before it becomes useful. And that is going to be a bit tricky, as there aren’t a ton of tutorials available yet (if you’re looking for more, check out USF Professor Dave Wolber’s Appinventor.org, which isn’t affiliated with Google).
The other key takeaway is that the variety of components offered in App Inventor still has a ways to go — and if the component you need isn’t there, you’re probably out of luck. Google says they’re working to add new ones, and down the line the Component Developer Kit will probably lead to a huge jump in available functionality. But for now, it’s definitely a good idea to get familiar with the available Functions before you start putting everything together. Whoops.